In this blog post, I’m sharing the 5 step strategy for practical and effective lesson plans that I use to craft all my lessons efficiently. Want a free template? Keep reading to grab your copy.

You don’t need a fancy lesson planning book, spreadsheet, or cute templates to create lesson plans. All you need is a clear goal and a piece of paper or a digital document, and, these five key steps.
If you’re a veteran teacher, perhaps you already know all about what I’m going to share. I hope you can find something useful, though. And, I would love it if you share any tips or tricks in the comments!
If you’re a new teacher, recently out of a credential program, you likely have experience designing and planning intricate lesson plans. Those plans are detailed from beginning to end: standards, learning objectives, materials, resources, procedures, rationale, adaptations, assessment, and reflection.
While all of these factors are essential to know and implement, I’ll be honest with you, these are impractical to actually write down for every single lesson plan.
The lesson plans you craft in a credential program are intense for a reason–they are to train you how to think, what to consider, how to adapt your plans for various needs, and how to use the assessment data to move forward. These are all processes we teachers need training in, hence the detailed planning in your training program! In the everyday flow of teaching, I’ve never created that meticulous of a plan, even when I had a formal observation by my principal.
So, if you’re a fledgling teacher (and that is said with love!), the question becomes: what do I need in my lesson plans?
Before I move into the direct answer, I do need to preface it.
To begin, the answer depends on the requirements of your school site or district. Some districts or administrators require teachers to turn in every single lesson plan. Yep. I’m serious. I’ve never worked at a school like that, but they’re out there, so know what’s expected of you! (Consider asking about expectations for teachers during your job interview, or talking with teachers at that school site before you sign a contract.)
Along with that, some school sites have grade level teams that work together to write lesson plans. This means you are likely beholden to what the team lead or the team as a whole wants in the plans. Once you’ve gained trust, you can of course offer alternative ideas and strategies.
Now, with that preface out of the way, let’s dive into the straightforward and easy to follow answer on the necessities for creating effective lesson plans.

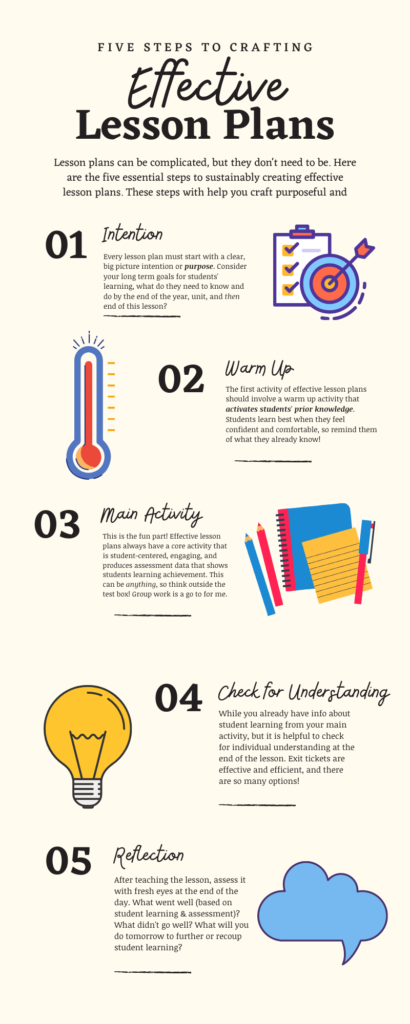
Step 1. To craft effective lesson plans, know your intention.
It is understandable and easy to do, but far too many teachers become caught up in the “fun activity” trap. It doesn’t matter how fun, or cool, or techy an activity is, if there is no overall purpose to it. Sure, your students will have fun, but they won’t make those essential connections to content or skills because you forgot to consider if there was a connection.
I’m not coming at you, I’m speaking from my own experience! Let me give you an example. In my first year of teaching, we were reading Ray Bradbury’s short story “2BRO2B.” As a new teacher, this was my first time teaching the story, and so I did what many teachers do–I went to Pinterest. I found an awesome activity to “prime students” for the story. It was elaborate, requiring immense preparation on my part. All for a 20 minute activity, but I was sure it was worth it.
Afterward, I was so excited because all the students participated! They were going to apply their thinking to the story! But, when they came back the next day, after reading the story as homework, they had no idea what was going on. They didn’t reference our previous activity or, in my mind, amazing discussions during it. When I brought it up? Silence.
The moral of this? Building prior knowledge or activating it is all about connection. A connection does not mean, “it’s on the same topic.” Rather, a connection must be deeper and thoughtfully crafted by the teacher. Sometimes connections happen authentically, which is amazing. These connections, whether incidental or planned, come from knowing your purpose.
This means you’ve thought about the goals you have for the end of the year, the end of the unit, and the end of this lesson. In other words, you’ve backward designed and this lesson fits into that design. If you’d like to read more about backward planning, check out my post here.
Does this mean you spend hours every day planning each lesson? No. This means before the school year starts, you use those first few, student-free days to map out your school year, semester, and units. You craft a big picture. With that big picture always in mind, you can spend significantly less time each day planning (or, if you can swing it, planning once a week).
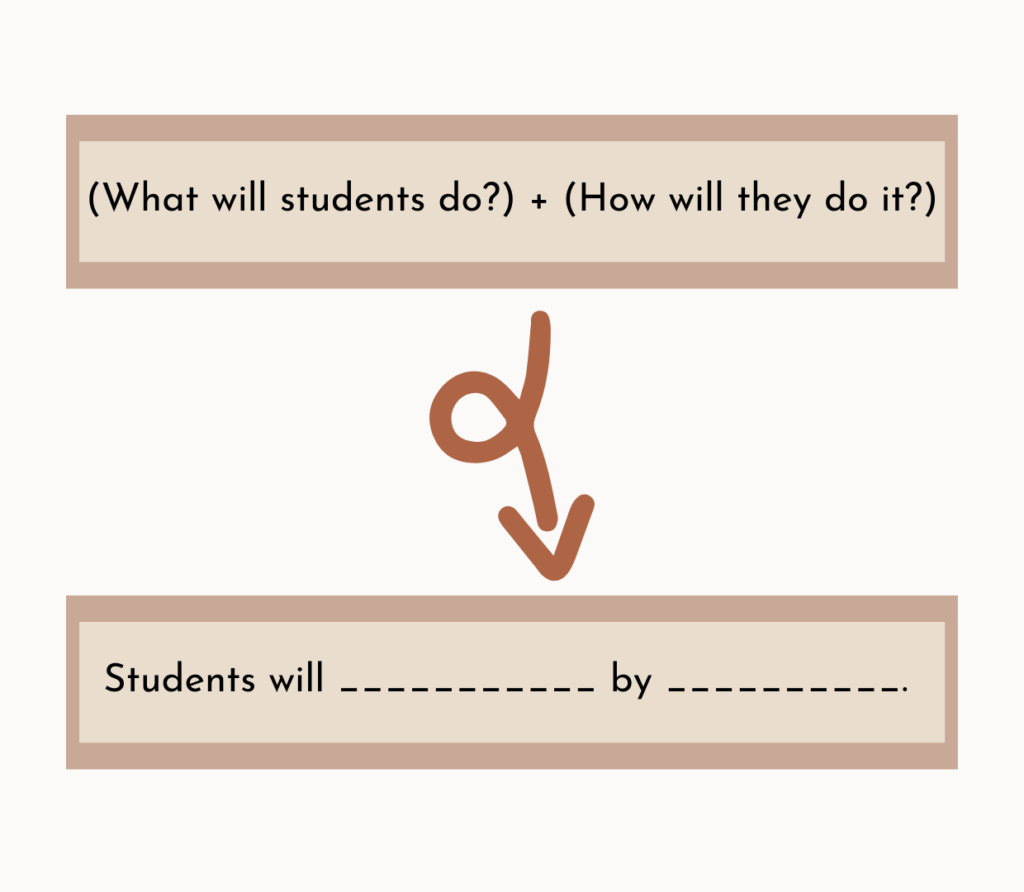
So, what do you write down on your lesson plan for Step 1? A learning objective.
My strategy for writing a learning objective is a bit like a math problem.

The “What” part comes from your standard, and the “How” part comes from your end goals — what do students need to produce in this lesson to show you their learning and that will help them tomorrow, next unit, the end of the year?
Step Two. Jump into the action of the lesson with a warm up.
There isn’t any one magic strategy for a warm up. It can be a journal entry, a review problem, an entry ticket, a quick discussion, a quiz (ungraded), an essential question. Really, the key for a warm up is that it is a short, approachable activity that lowers students’ affective filters and activates their prior knowledge.
Why does the warm up need to lower students’ affective filters? Well, so they can learn. If you shock students or scare them with a pop quiz that will impact their grade at the start of a lesson, they will react. Some will be fine, others who react adversely to surprises and are anxious, they won’t be fine. They will clam up. Or, if you prefer, they will puff up like an angry cat. It will take them most of the period to relax again, and that’s only if you make them feel comfortable.
Make the warm up activities routine. You don’t have to do the same, exact, thing, everyday. Have a few in your repertoire and cycle through them. Make them low impact on students’ grades, I suggest no impact, and allow students to be open in their responses.
Preferably, try to craft warm ups that allow students to share their own opinions, or to work with partners to arrive at the “right” answer if there is one.
Another tip, find a way to, even briefly, get out of the way. Guided instruction is helpful during the warm up, so you can correct misunderstandings and build students toward the main goal of the lesson. However, a lecture alone isn’t a warm up, that’s a presentation. Perhaps you need to review the directions, clarify terms, or model the warm up. Great, do it and then move aside. Let students talk, do, and work through their prior knowledge without you in the way.
Check out ThoughtCo.’s article on “Warm-Ups for Lesson Plans” for a few ideas.
Warm ups are important, so don’t rush them! Although they aren’t the main activity, so make sure you have enough time to accomplish what you need to for students to show what they’ve learned. I suggest 5-15 minutes on the warm up activity.
Step Three. The main activity of an effective lesson plan, cultivate student content knowledge and/or skills.
This is what we normally think of when we hear “lesson plans.” During this portion of the lesson, students are front and center. They are active, and teachers are coaches or facilitators.
As stated before, the key to any successful lesson plan is its purpose. With the purpose established in step one, you can focus on other aspects of this portion of the plan: assessment, timing, and student groupings.
Let’s say the main activity involves working in groups to solve 4 math problems, at my school these are called table tests (not graded as “tests,” but they prepare students for the tests). The goal, the intention, here is two fold: (1) students thinking through and solving the problems of focus, which means they are working toward meeting the learning objective, and (2) students learning how to work together and hold each other accountable. Not only are students developing their content knowledge, they are also building collaboration skills.
That is the power of a well intentioned lesson plan. It is multifaceted and fosters skills and content knowledge simultaneously. Plus, you also have a few different built in assessments.
- As students work together, you can walk around the room, or monitor different discussions on Zoom or Google Meets, and hear students’ discussions about the problems, which is an informal, formative assessment.
- While walking around and listening to groups, you can also assess students’ ability to work together and find ways to contribute to the group learning.
- After collecting student work, you can assess the work itself and see students’ thinking, their successes and the areas for growth and reteaching.
Part of designing this activity means figuring out the timing. How much time will this activity take? How long can students sustain focus (high schoolers, not more than 20 minutes without a break)? These are questions we can predict, and then which we will adapt for during the lesson itself. What will you do if some groups finish earlier than others?
Another factor to consider in planning this activity, grouping. How will you group students? Same-skill or mixed-skill? How will you group students to support your ELs and IEP students? There isn’t one answer that always works, it all depends on what you’re wanting students to achieve. For most activities, I use mixed groups, but when doing a long term project that allows student choice, like literature circles or a research project, I will use same-skill groups.
This is the “main activity,” which also makes it the longest activity. If going longer than twenty minutes, I suggest planning in guided transitions or breaks to avoid fatigue.
Step Four. Checking for understanding = effective lesson plans.
Yes, you may already have an assessment and some data from the previous activity. However, if you did group work, it is beneficial to check for individual understanding. After a transition to independent work, do the students remember what they’ve learned?
Exit tickets are quick and easy ways to gain information about students’ understanding. ThoughtCo. shared a list of a few different exit ticket strategies to try.
But, do you need to collect paper? No, you can do an electronic survey or even a discussion. During distance and hybrid learning, I asked students to share in the chat. In person, I have students either write it down or volunteer to tell me what they’ve learned. Discussions do take longer, so if you don’t have much time left in the period or block, do something else!
Just like the warm up, make it approachable and easy, for both you and the students. Also, I suggest making this one of the shortest pieces of the lesson, 5 minutes should work well in most cases.
Step Five. Reflect.
this is really for after the lesson, or perhaps at the end of the day. Reflection.
I’ve written a blog post about reflection, so if you want to read more about the power of it, check that out.
As tedious as it sounds, reflection should occur daily, even if it is a two minute process. I promise, reflection is vital to crafting effective lesson plans
Why is this a daily process? Because, unless it’s Friday, you have to come in and teach tomorrow. What do your students need from you? Do you need to adapt your plans based on today’s learning? In other words, ask yourself two key questions: What went well? What didn’t? And then look at your next lesson plans and adapt as needed.
For my first few years of teaching, I had a notebook, just a regular, college-ruled thing, where I put all my thoughts, it seriously helped keep me sane. I also used this notebook to reflect. For some, a T-chart or two column system works, for me, I just answered the 2 questions in bullet point form. Test out different methods.
For others, it might be helpful to talk it out, so you can debrief with a colleague, or you can even use the voice recorder on your phone. If you have the hands-free driving figured out, you can do this on your way home to help decompress!
I always liked to end my entry with some positivity for the next day, so find some quotes, a mantra, or inspiration elsewhere and give yourself some hope!

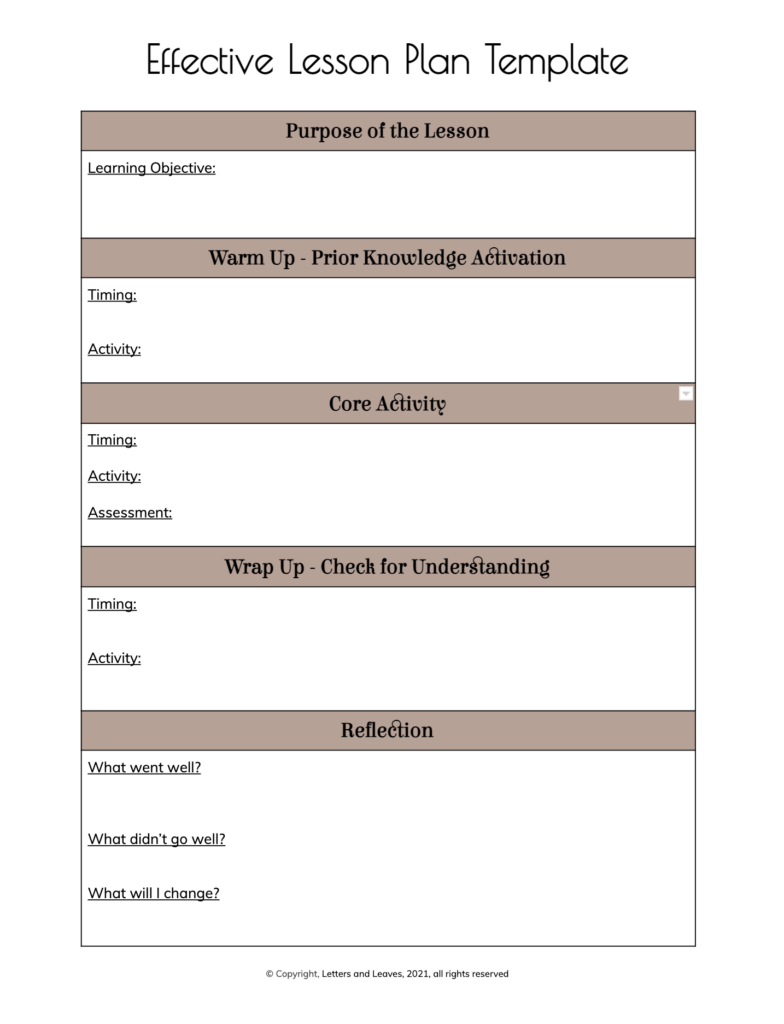
Want a free template of this effective lesson plan? Click here!
In the end, lesson plans don’t need to be complicated to be effective. You can simply list out the 4-5 steps of your plan, prepare the materials and resources you need ready (including a timer to transition between steps!), and keep your purpose in mind.
If all goes to plan, that’s amazing and you should definitely celebrate. If nothing goes to plan, you are not alone. After some tears or some candy, reflect on what needs to go differently next time. You’ve got this! Keep crafting those effective lesson plans, your students will thank you–perhaps not right now, but years later!
Like much else in life, planning and teaching become easier with time.
Happy teaching! 🙂
 Song Battle Project: Teaching Songs with Rhetorical Analysis
 Teacher Self Reflection: A Guide
 The Odyssey: A Guide to Prepping Students with Pre-Reading Activities